Vulnix Writeup (Vulnhub Intermediate Machine)

Here we have a vulnerable Linux host with configuration weaknesses rather than purposely vulnerable software versions (well at the time of release anyway!). The goal; boot up, find the IP, hack away and obtain the trophy hidden away in /root by any means you wish.
Overview
Vulnix is an intermediate Unix-style machine from Vulnhub. This is a very old box, focusing mainly on configuration weaknesses rather than unpatched software vulnerabilities.
We start by performing enumeration on multiple running services, like SMTP and NFS. We mount a directory from Vulnix to our machine and replicate the owner user to gain write access. Then we add our RSA public key to the whitelist of allowed hosts and login into the machine via SSH.
Once inside, we get access to the NFS configuration file and modify “root_squash” security feature. That allows us to upload the Bash binary to the target machine with the SUID bit set. Running it gives us the root shell and full control over the Vulnix box.
Nmap scan
Starting with Nmap scan.
┌──(kali㉿kali)-[~]
└─$ sudo nmap -Pn -A 192.168.1.69 -T5
Starting Nmap 7.95 ( https://nmap.org ) at 2025-05-03 07:26 EDT
Nmap scan report for 192.168.1.69
Host is up (0.00029s latency).
Not shown: 988 closed tcp ports (reset)
PORT     STATE SERVICE    VERSION
22/tcp   open  ssh        OpenSSH 5.9p1 Debian 5ubuntu1 (Ubuntu Linux; protocol 2.0)
| ssh-hostkey:
|   1024 10:cd:9e:a0:e4:e0:30:24:3e:bd:67:5f:75:4a:33:bf (DSA)
|   2048 bc:f9:24:07:2f:cb:76:80:0d:27:a6:48:52:0a:24:3a (RSA)
|_  256 4d:bb:4a:c1:18:e8:da:d1:82:6f:58:52:9c:ee:34:5f (ECDSA)
25/tcp   open  smtp       Postfix smtpd
|_smtp-commands: vulnix, PIPELINING, SIZE 10240000, VRFY, ETRN, STARTTLS, ENHANCEDSTATUSCODES, 8BITMIME, DSN
|_ssl-date: 2025-05-03T08:12:29+00:00; -3h17m20s from scanner time.
| ssl-cert: Subject: commonName=vulnix
| Not valid before: 2012-09-02T17:40:12
|_Not valid after:  2022-08-31T17:40:12
79/tcp   open  finger     Linux fingerd
|_finger: No one logged on.\x0D
110/tcp  open  pop3?
| ssl-cert: Subject: commonName=vulnix/organizationName=Dovecot mail server
| Not valid before: 2012-09-02T17:40:22
|_Not valid after:  2022-09-02T17:40:22
|_pop3-capabilities: RESP-CODES STLS CAPA PIPELINING SASL UIDL TOP
|_ssl-date: 2025-05-03T08:12:28+00:00; -3h17m20s from scanner time.
111/tcp  open  rpcbind    2-4 (RPC #100000)
|_rpcinfo: ERROR: Script execution failed (use -d to debug)
143/tcp  open  imap       Dovecot imapd
|_imap-capabilities: STARTTLS IMAP4rev1 post-login ENABLE more LITERAL+ have listed SASL-IR IDLE Pre-login ID LOGIN-REFERRALS OK LOGINDISABLEDA0001 capabilities
| ssl-cert: Subject: commonName=vulnix/organizationName=Dovecot mail server
| Not valid before: 2012-09-02T17:40:22
|_Not valid after:  2022-09-02T17:40:22
|_ssl-date: 2025-05-03T08:12:29+00:00; -3h17m20s from scanner time.
512/tcp  open  exec       netkit-rsh rexecd
513/tcp  open  login
514/tcp  open  tcpwrapped
993/tcp  open  ssl/imap   Dovecot imapd
|_imap-capabilities: IMAP4rev1 AUTH=PLAINA0001 ENABLE more LITERAL+ have post-login SASL-IR listed IDLE Pre-login LOGIN-REFERRALS OK ID capabilities
| ssl-cert: Subject: commonName=vulnix/organizationName=Dovecot mail server
| Not valid before: 2012-09-02T17:40:22
|_Not valid after:  2022-09-02T17:40:22
|_ssl-date: 2025-05-03T08:12:29+00:00; -3h17m20s from scanner time.
995/tcp  open  ssl/pop3   Dovecot pop3d
|_pop3-capabilities: RESP-CODES PIPELINING CAPA USER SASL(PLAIN) UIDL TOP
| ssl-cert: Subject: commonName=vulnix/organizationName=Dovecot mail server
| Not valid before: 2012-09-02T17:40:22
|_Not valid after:  2022-09-02T17:40:22
|_ssl-date: 2025-05-03T08:12:29+00:00; -3h17m20s from scanner time.
2049/tcp open  nfs        2-4 (RPC #100003)
MAC Address: 00:0C:29:42:0B:1A (VMware)
Device type: general purpose
Running: Linux 2.6.X|3.X
OS CPE: cpe:/o:linux:linux_kernel:2.6 cpe:/o:linux:linux_kernel:3
OS details: Linux 2.6.32 - 3.10
Network Distance: 1 hop
Service Info: Host:  vulnix; OS: Linux; CPE: cpe:/o:linux:linux_kernel

Host script results:
|_clock-skew: mean: -3h17m20s, deviation: 0s, median: -3h17m20s

TRACEROUTE
HOP RTT     ADDRESS
1   0.29 ms 192.168.1.69

OS and Service detection performed. Please report any incorrect results at https://nmap.org/submit/ .
Nmap done: 1 IP address (1 host up) scanned in 176.24 seconds
The Nmap scan showed 12 open ports. Port 22 for SSH, ports 25, 110 and 143 for mail services such as SMTP, POP3 and IMAP (with SSL versions as well), plus port 2049 for NFS and couple of other custom services. This is definitely a wide playground for us with lots of possibilities, as each service can be enumerated for potential misconfigurations.
You can also perform a vulnerability scan with Nmap and you will get a lot of output. For the sake of this writeup, I’m not gonna touch that here, because most of it is not really important.
Service enumeration (SMTP, Finger, NFS)
There are a lot of services running on the machine, let’s enumerate them one by one. SSH is not gonna give us anything valuable when we don’t have credentials, so I’ll skip this one for now.
SMTP enumeration
Next up is SMTP (Simple Mail Transfer Protocol), which is used primarily for sending emails. But when misconfigured, can leak crucial information about target’s email infrastructure. Probably the biggest design flaw of SMTP is the possibility of enumerating usernames. We can use tool like “smtp-user-enum” to fuzz for valid usernames on the machine.
SMTP has the “VRFY” option built in, which verifies given usernames. I used Metasploit’s “unix_users” wordlist for enumeration. After preparing my command, I ran the script and got couple valid usernames back, most of which were service accounts and not real users.

You can try other alternatives like using Metasploit’s auxiliary modules or enumerating directly via Netcat, but every road leads to Rome here, to the same result. Now, I could go and try to brute-force the passwords for these users one by one with Hydra, but that should be the last resort here. Before launching our next attack, let’s enumerate a bit further.
Also, since IMAP (Internet Message Access Protocol) and POP3 (Post Office Protocol 3) are used for email retrieval and storage, they go hand-in-hand with SMTP. That’s why I’m not gonna show you additional enumeration of these two, because there isn’t really much we can get from it now.
If you really want to learn the process of enumerating IMAP and POP3, you can always ask ChatGPT or simply watch some Youtube videos. All information is at your fingertips.
 |
| example POP3 and IMAP enumeration methods showed by ChatGPT, USE CHATGPT! |
Finger enumeration
You may notice that there is a strange service running on port 79 called “Finger”. To be honest, I myself didn’t know anything about Finger, so I had to do some research.
The Finger protocol (RFC 742) is a very old network protocol that runs on TCP port 79. It was primarily used to retrieve information about users on a remote system — things like login status, full name, idle time, home directory, etc. (ChatGPT)
You can read more about Finger here: https://datatracker.ietf.org/doc/rfc1288/. The way this works is like this: you enter a username and the server replies back with information about the user.
Now that we are a bit smarter, let’s confront this Finger protocol using Netcat. At first, I tried user “root”, which existed on the machine, and looked at the response.
 |
| enumerating Finger service |
The server did indeed return some information, like login status, home directory and name. This is very good, but still got us nowhere practically. We need to keep enumerating other services.
Honorable mention: other 2 unusual services on ports 512 and 513 didn’t give me anything neither. One terminated the connection and the other sent me a weird message. Thus, I’ll skip these too.

NFS enumeration
Next service is NFS (Network File System) on port 2049. NFS is a distributed file system protocol, which allows users to access files on different host over a network by mounting the exported files.
We can use command “showmount” to list all directories on the target machine that are accessible.

It looks like only “/home/vulnix” is mountable. Notice that we also found another potential user “vulnix”. You can even check and validate, that “vulnix” is a valid user with appropriate tools.
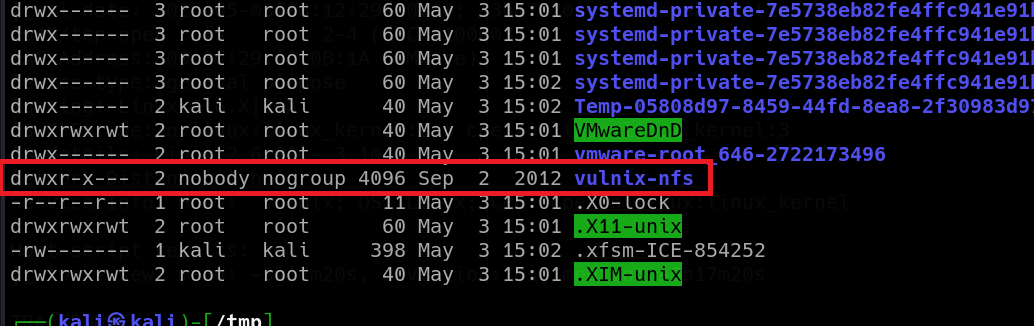
It’s time to mount this user’s home directory to our machine, so we can access his files. So I went to the “/tmp” and created a temporary directory. Then, I mounted Vulnix’s home directory to my temporary one. But I couldn’t access it.
 |
| cannot access mounted directory, probably because of “root_squash” security feature |
This is caused by certain NFS security feature called “root-squash”. It prevents remote users from getting full control over the mounted directories with their local root privileges. When we check the permissions of the mounted directory, we get to see user “nobody” as owner.
Once again, I did some research because I was kinda new to NFS stuff. I found out that adding option “vers=3” (probably specifying some version) makes the owner of the mounted directory to be displayed by UID “2008”. Which is good for us, because we can replicate this user now.
 |
| adding extra option to the “mount” command, the owner user is now represented by UID |
So I added new user “vulnix” to my machine with UID “2008”. After switching to him, I could finally access the mounted directory and do whatever I wanted.
 |
| adding new user “vulnix” to my machine, replicating the owner of the mounted directory |
Giving ourselves SSH access by allowing our RSA public key
There is nothing interesting inside this directory. But remember, that we still have write access too. My plan was to create “.ssh” directory and add my RSA public key into the “authorized_keys” whitelist. That would secure my access to the machine via SSH without having to enter a password.
Firstly, create the “.ssh” directory inside the mounted directory.
┌──(vulnix㉿kali)-[/tmp/vulnix-nfs]
└─$ mkdir .ssh
Secondly, go grab your RSA public key from your “/home/[YOUR USER]/.ssh/id_rsa.pub” file. If you don’t have your RSA key pair yet, run this command to generate one:
ssh-keygen -t rsaThirdly, create the “authorized_keys” file inside the “.ssh” directory in the mounted directory and enter your RSA public key.

Lastly, simply go login to the Vulnix machine via SSH with your RSA private key. You just need additional flag to specify the algorithm, which is RSA.
┌──(kali㉿kali)-[~]
└─$ ssh vulnix@192.168.1.69 -i .ssh/id_rsa -o 'PubkeyAcceptedKeyTypes +ssh-rsa'
And we finally have our initial foothold! Now we have to look around to see where can we pivot next. I looked at the “/etc/passwd” file and found out that there’s one other user called “user”.
vulnix@vulnix:~$ cat /etc/passwd | grep bash
root:x:0:0:root:/root:/bin/bash
user:x:1000:1000:user,,,:/home/user:/bin/bash
vulnix:x:2008:2008::/home/vulnix:/bin/bash
vulnix@vulnix:~$ ls -la /home
total 16
drwxr-xr-x  4 root   root   4096 Sep  2  2012 .
drwxr-xr-x 22 root   root   4096 Sep  2  2012 ..
drwxr-x---  3 user   user   4096 Sep  2  2012 user
drwxr-x---  4 vulnix vulnix 4096 May  3 17:55 vulnix
Compromising user “user” by brute-forcing his password with Hydra
We probably have to gain access to the “user” account. At this point, I thought that it’s time to finally utilize Hydra and perform SSH login brute-forcing. I used Metasploit’s “unix_passwords” as password wordlist. I let it run for some time. And Hydra found a match!

So I logged into the machine via SSH as user “user”. Unfortunately, there was nothing in his home directory neither. So I grabbed my fictional checklist of privilege escalation techniques and went through it. I started with sudo permissions, but there were none for “user”.
user@vulnix:~$ ls -la
total 28
drwxr-x--- 3 user user 4096 Sep  2  2012 .
drwxr-xr-x 4 root root 4096 Sep  2  2012 ..
-rw-r--r-- 1 user user  220 Sep  2  2012 .bash_logout
-rw-r--r-- 1 user user 3486 Sep  2  2012 .bashrc
drwx------ 2 user user 4096 Sep  2  2012 .cache
-rw-r--r-- 1 user user  675 Sep  2  2012 .profile
-rw------- 1 user user    7 Sep  2  2012 .rhosts
user@vulnix:~$ sudo -l
[sudo] password for user:
Sorry, user user may not run sudo on vulnix.
After some time, I realized that “user” is most likely not gonna get me anywhere. So I switched my attention back to user “vulnix”, as I haven’t checked his sudo permissions yet.
Modifying NFS configuration & compromising the “root” user
As “vulnix”, I ran “sudo -l” to check my user’s sudo permissions. It turned out that I can run “sudoedit” on “/etc/exports” file as root without specifying password, which looks very promising.
vulnix@vulnix:~$ sudo -l
Matching 'Defaults' entries for vulnix on this host:
    env_reset, secure_path=/usr/local/sbin\:/usr/local/bin\:/usr/sbin\:/usr/bin\:/sbin\:/bin

User vulnix may run the following commands on this host:
    (root) sudoedit /etc/exports, (root) NOPASSWD: sudoedit /etc/exports
The “/etc/exports” file is actually the home of NFS configurations, specifying what directories can be mounted, by who and with what permissions. Allowing us to edit this file, we can modify the entire configuration of NFS and compromise the “root” user in numerous ways.
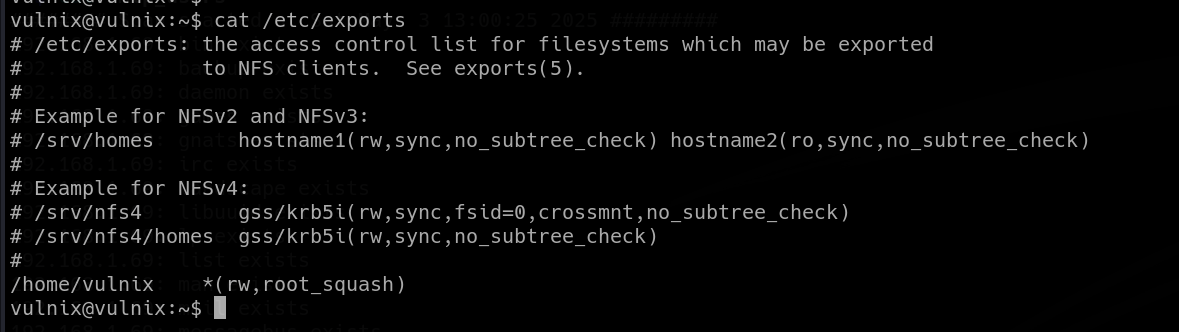
As I mentioned earlier, there’s the “root_squash” feature that has been restricting our access. But now, we can simply turn it off by modifying the NFS config file.
The plan is the following: Disable the “root_squash” feature and re-mount Vulnix’s home directory. Use our local root privileges to transfer a copy of “/bin/bash” to the mounted directory and set the SUID bit, so it can be ran as root on the target machine. This is one of the ways to get root. I will briefly mention another method at the end as well.
Firstly, let’s use our elevated privileges and modify the “/etc/exports” file. All we have to do is change the “root_squash” option to “no_root_squash”.
 |
| disabling the “root_squash” feature in “/etc/exports” NFS config file |
Secondly, we have to apply these changes. Normally, we would run command “exportfs” to save the changes, but we don’t have sufficient privileges to do that.
 |
| cannot apply the changes due to insufficient privileges |
Luckily, restarting the target machine does the job just fine. Weird way of doing things but it looks like the only way.
Thirdly, we need to transfer a copy of “/bin/bash” to the mounted directory. You need root privileges on your newly-added user to be able to do this so add that if you haven’t already:
sudo usermod -aG sudo [YOUR CUSTOM USER]Then you can copy “/bin/bash” binary into the mounted directory. Don’t forget to set the SUID bit.

Fourth, go back to the target machine and run the “shell” binary and… cannot execute the binary?!
 |
| cannot run the 64-bit “shell” binary on the 32-bit Linux architecture |
Ain’t gonna lie, this startled me a little bit. It turned out that I am trying to run my 64-bit Bash binary on 32-bit architecture (highlighted red). “I686” practically means 32-bit system. Totally my fault, even the description of this machine on Vulnhub said that this is a 32-bit system. Maybe necessary for this writeup, but I still wanted to show what I did badly for the sake of learning.
Trying to get root shell with 32-bit C script (failed)
Another method that came to mind was to get the root shell by crafting a 32-bit C script that invokes the “/bin/bash” as “root”. I wrote this simple script in C and compiled it with GCC into a 32-bit LSB executable, with owner and group set to “root”.


I copied the C script into the mounted directory again and set the SUID bit.

I went back to the target machine and ran the “shell” script. Aaaaand that failed too. Just because a fr**king GLIBC was not installed on the machine.
 |
| cannot run 32-bit “shell” binary because of missing up-to-date GLIBC library |
At this point, I was running out of options. I had to sit back and think about this for a bit.
Getting root shell with 32-bit Bash binary
After some time, an idea came to mind. What if I borrow Vulnix’s 32-bit Bash binary and use it against it. So I transferred the binary to my machine. I utilized “user”, because I knew his password.

Same process, I copied the “shell” (Bash) binary to the mounted directory, changed it’s owner to root and set the SUID bit.

Back on the Vulnix machine, I ran the binary with “./shell -p”. And I got the root shell!
 |
| getting root shell by running 32-bit “shell” binary with SUID bit set |
There was “trophy.txt” in the “/root” directory. Be sure to claim your trophy :D.

Securing persistency as Root
Last question was, how to secure persistency? How to create some kind of backdoor? Well, a great way would be to repeat the process as we did when getting the initial foothold, by adding our RSA public key to root’s “authorized_keys” whitelist.
 |
| copying my RSA public key to “authorized_keys”, securing Root SSH access |
Now try to access the machine via SSH as “root”.

The Vulnix machine has been fully compromised successfully.
Alternative way to get root shell
There’s one alternative method to get root shell, which I practically showed you 2 times already. The idea is to add “/root” into the “/etc/exports” file with “no_root_squash”, so it can be mounted and accessed with unrestricted root privileges.
 |
| adding “/root” to the list of mountable directories |
After that, simply mount the “/root” directory to your machine and create the “.ssh” directory with the “authorized_keys” file and add your RSA public key to it, just as I showed you above under the “Securing persistency” headline. Then, simply use your RSA private key to access the “root” user.
Summary
Vulnix is an intermediate machine from Vulnhub. This box is perfect for beginner/intermediate cybersecurity enthusiasts. It’s an old challenge from 2012 and tackles mostly configuration vulnerabilities. There are many services running on many ports, like SMTP, POP3, IMAP and NFS. During the enumeration process, we will uncover a NFS misconfiguration, leading to exploitation and gaining initial foothold on the machine. Once we gain access, we perform an internal enumeration and discover writable NFS configuration file. We modify this configuration and allow local root privileges on the mounted directories. This leads to uploading the Bash binary with SUID bit set, which allows running it as “root” and get a root shell. We will also secure persistency by adding our RSA public key to the whitelist. I liked this box very much, it was a lot of fun. I particularly liked how many different approaches you could take to get to the root. I mentioned some of them, but maybe not all of them. It’s also nice that this box is purely based on configuration weaknesses and doesn’t simply use vulnerable software versions like we are used to in other CTF machines (maybe there are some, it’s from 2012, so…). Main star is the NFS service, which also doesn’t get a lot of attention in cyber CTFs, so I’m glad to have it here. This challenge definitely requires some knowledge of Linux fundamentals and cybersecurity experience, so it’s best suited for intermediate hackers. Beginners shouldn’t be discouraged, because there is a lot to learn from this machine. Recommending to anyone, who likes to take on a slight challenge. But definitely feels satisfying to get that trophy at the end.


Comments
Post a Comment